Sunday, November 27, 2011

Operation Office Complete,FINALLY!

Long time, no blog! I think I am about to have my blogger card revoked if I don't start posting more! But I have been busy, and have some great project photos for you. 

Operation Office is now complete. I decided a few months ago to make our second guest room an office. It has really only been a storage closet since we moved in, so it was time to make it presentable. The cow painting I bought and posted earlier was my inspiration. See what you think!

For this room makeover, I had to buy some things that I couldn't make myself. I love the table, it has a beautiful wood top and barn red legs. I bought it at Rooster Tails, a custom furniture store in Franklin, TN. They have awesome, awesome, awesome items that are a great price. 

The other chair is a hand-me-down from my Grandmother. She used to rock my dad to sleep in it at night. It is one of my favorite pieces in our home. The red chair used to be blue, it is an old school chair that I found in Mom's garage. I decided to paint it the same color of the desk. I took a toothbrush from the bathroom and used black paint to rough it up a little. Davey got on to me later for using the toothbrush :) I am now known as the Macgyver of painting!

I wanted to build a bookshelf out of some old barn wood we collected, but we just couldn't get it to work. I finally gave up and found this bookshelf at World Market for a great price. The storage bins have little chalkboard squares on the front for organizing. We quickly filled it up with books and other knickknacks found in the house.

I also experimented with chalkboard paint for the first time. We have several old windows at home that I have used for different projects over the years. I was inspired with chalkboard paint after seeing a picture of a window that had been made into a nightly menu list for someone's kitchen. I thought it would also be cute for the office. Here is how I did it:

You can find old windows similar to these at yard sales, flea markets, etc... I like that this one has old rope on each side. First, you need to sand any old paint off the sides so the tape will stick and paint chips won't fall in the wet paint.

Then tape the edges and put a coat of chalkboard paint on the window. I did this without priming the window and the paint didn't stick. I suggest using the chalkboard spray paint instead of brush on kind. I think it would do better without having to use a primer. You will need to put a few coats on until you can't see through the glass anymore. That is all, super easy!!!

Here is the final shot of the window and chair. Both projects were simple and fun.

Next project on is Operation Christmas! Pictures coming soon!

Tuesday, September 27, 2011

Old Shutters Make Awesome Nightstands

So this project is halfway complete. One nightstand down, one to go. I am super happy with how this one turned out...hope you like it too! Here is how we did it-

Find wood shutters (these were leftovers from my parent's house) and measure how tall you want the nightstand. Next, begin cutting!
After cutting the shutters we measured the sizes for the top and base of the nightstand. We made a list and headed to Lowe's (and only had to turn around once to get the measuring tape)!


The Lowe's trip went pretty smooth. Here are supplies we bought- total amount for making our nightstands, get ready.....only $64.00, insane!!!!

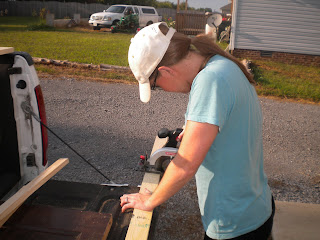
Ok, so don't laugh too hard at our cutting saw. We couldn't find anything but tupperware filled with holiday decorations, but it worked just fine! We cut the base and top of the nighstand and put it all together,this part was very difficult because none of the shutters were the same length or width.


I have to be honest, Davey pretty much did all the building on the project.I just supervised and bossed him around, which is what I do best. Bless him for not hacking at me with that saw! My part in the project- painting and distressing! Oh, and I picked out the cute hinges and spiral knob. Here is the final product!!!!!


Sneak peak for our next project(who knows why the pic looks yellow)...
We are in the process of designing a home office and I surprised Davey with this painting. Isn't it cute?! Davey loves cows so I thought this would  be a nice touch for his office.


Sunday, September 18, 2011

September Activities

September activities = lack of projects. UT games, fair activities, and work have left me with little time to get projects done around the house. I was able to pull out fall decorations today, and am super excited to get pumpkins for the front porch. Fall is one of my favorite time's of the year, it is when Tennessee looks truly beautiful.

Being a Britton means I now have to be a UT fan, I don't have much option here so I try and accept it and enjoy the games. Here is a picture from last week's game.

We spent the weekend in Pigeon Forge and did a little shopping and Davey was dying to see the Titanic Exhibit. It was everything I expected and a little more. I don't read every little article like my husband,but needless to say he got his money's worth. That man is just like my father when it comes to spending three hours in one exhibit!

Ok, so hear is the sneak peak to my project of the week! Hopefully this one will be finished by next weekend.

These are old shutters from my parent's home.My mother doesn't throw anything away and bless her for it because that house is a hidden treasure chest for my projects! While Davey delivered a Gator the other day, Mom and I spent our time getting these out of the rafters in the garage. Thirty minutes later, covered in dirt and dead spiders, I had about 10 shutters in perfect condition loaded in the truck. Davey doesn't even ask questions, just sucks it up and supports my projects. Here is the picture that inspired my future nightstands!


Wish us luck! Have a great week everyone!

Thursday, August 25, 2011

Project 1- From Door to Headboard


Project 1 is a success! Woo hoo! I knew we could do it, but I must admit that I was a little nervous. I knew what I wanted, but explaining this to Davey and getting him on the same page was a little difficult. But after two hours in Lowe's, we finally figured it out! Keep reading to see how we did it-

Before


We got the door from a friend who keeps everything, he had a shed full of doors and it was hard to decide which one I wanted. You can find these at yard sales, used furniture stores and even Craigslist.


First we made our list and went to Lowe's to get items we needed. Shopping for items was the hardest part because Lowe's is not my friend and deciding what we needed was easier said than done. We ended up buying too many items, but at least we had everything we needed to complete the project. When we got home we measured the door and trimmed it down to fit the bed frame.


The next step was to trim all the moulding we bought and attach it to the bed. I was super excited about this step because I really wanted to use the power tools. Davey showed me what to do, and I was ready- then I learned the dang safety button was too far away, my thumb was too small! I need female specific power tools for the next project!

After trimming the moulding, we attached it to the door and then stained the moulding to match.
This was my favorite part! Staining I can handle a little better than power tools.
Beautiful!!!! We were getting really excited by this point and just praying that we made it the right length for the bed. It turned out perfect.
After
I love it! It is exactly what I wanted. Thanks, B for the owl pillow- it matches the room great! I think Ellie likes the new bed too :)

This was a really fun Sunday project and it only took a few hours. Davey is starting to like these projects, even though he doesn't ever really see my vision until it is complete, but marriage is all about trust, right!? Ok, off to eat a s'more. Goodnight! 

Sunday, August 21, 2011

Married Life - Year 1

Davey and I have been married a little over two months now and I must say it has been quite an adventure. I have moved 3 times in the last 3 months. We are FINALLY in our new home and settling in nicely. New home equals new projects. How I love projects. I get this from my mother, who has always helped me decorate my house. We enjoy going to yard sales, auctions, and random buildings to find old furniture, aka scraps (my terminology). We enjoy taking other people's scraps and making something new. Now that I am married, my sweet husband gets dragged into these projects. He has always been helpful with our projects, as manual labor is always appreciated. But now that we are married, it has become OUR projects - he is SO excited ;)....

Project 1 is going to be making a new headboard from an old door. The project begins today, so check back soon to see if we succeed!

I hope that you enjoy reading our blog and learning more abour our life, projects, and things that make us happy. You will see and hear a lot about my dog child, Ellie - so if you don't like dogs then you should just leave this site right now :) Happy blogging!

Emily and Davey